I love photography and want to share what I know. Hopefully it will help make you a better photographer whether you are a professional or a complete amateur!
Tuesday, February 27, 2007
Flashin' for the fun of it!
Here is a quick overview of what I will be discussing.
Friday, February 23, 2007
Seattle Photographers Shootout Images!
Tuesday, February 20, 2007
Interesting B&W Conversion

Sean Flanigan has a fun b&w technique to play with over on his blog. Below is the photograph I took of Leslie recently. I played with the technique Sean talks, modified it a bit and added a slight sepia tone to add to the vintage feel.
A photogeek's dream office!
Monday, February 19, 2007
Seattle Photographers Shootout!
 Andrew for the Dgrin/Smugmug forum
This is Ben. I photographed his and Sarah's wedding a couple years ago!

Sarah!

The only member of the Portland Mafia to attend: Evrim Icoz!

The handsome Joe Hein

The love of Joe's life (besides his D2x) Jill Hein

Joe and Jill with their custom branded cameras.

John Krombine from the Madison Park Starbucks meeting I talked about earlier (third Thursday at 11:00).

I make this alley look good.

Here's the whole photogeek squad

Master planner and photographer extrodinairre, Mat Hayward

When looking for a shot, gotta love the cobblestone - much cozier than asphalt.

Laurence Chen from the Digital Wedding Forum

My favorite image of the day, bar none. My lovely wife Leslie who is the light of my life and my best friend!
Friday, February 16, 2007
The steps to a photography business - the short version!
My answers would go in this order:
1) Get what you need in the way of equipment to produce good work. This does not need to be the flashiest of gear (a 50 1.8 or 35 f2 could be a big improvement in creating a "different" look on the cheap as would a 85 1.8). A vivitar flash and some pocket wizards (or generic alternative) can create dramatic results in the right hands as Zach Arias has often shown. Also get something wide (20mm on 5d or a 12-24 f4 tokina on a crop camera) to add drama and see things a different way. With a couple of these suggestions, you can be producing a wide variety of different looks and have spent less than $1000. It also works as a backup strategy if something breaks.
2) Educate yourself in creating amazing images. One Light is a good place to start. As is the usual $100 Denis Reggie tour, or if Huy is doing a short course in your area. There are also many online resources. Second shooting for great shooters would work very well.
3) Once you know how to take amazing images, are inspired, well-equipped to take advantage of the opportunities you have or will get, and have a website capable of showing off your work in a up-scale, stylish way, then you can pour some money into advertising.
It is hard to work up a buzz as an average photographer, so educate yourself, equip yourself, produce some excellent work, THEN attack the marketplace. Spending money on advertising before you are ready is just wasting money. Getting yourself in position to attack the marketplace makes more sense.
What you have in the way of assets (namely time and money) will determine your strategy for the attack and the timetable involved. If you have more money than time (full time well-paying job and a family for example), spend the money on the best possible samples and advertise in the biggest, splashiest places. If your assets are more on the time side (part time working bachelor), then you might get a couple nice samples and try to get your name out by meeting everyone that will meet with you (florists, planners, venue coordinators, other photographers, etc.).
Madison Park Starbucks...

The third thursday of every month, a bunch of photographers get together to talk, share knowledge, be photogeeks and feed the elegant and classy addiction that is Starbucks. Networking and talking with photographers is a great way to fill the empty dates on your calendar. I get a few weddings every year from other photographers. It's like hanging out and talking about your favorite thing (photography) a finacially and educationally beneficial activity!
Here are a few images from yesterday. Some taken by me, and others taken by the wonderful Joe Hein of Joe and Jill Photography.

Great photographer and friend, Joe Hein of Joe & Jill Photography.

Eric Sartoris of Northern Lights.

The photogeek known as Cory Parris. I think Joe took this one!

The character that is Dani Weiss.

And the illustrious Natalie Fobes.
Choosing the right flash batteries
There are basically four options: alkaline, nimh, ni-cad, and external packs.
Alkaline batteries are the easiest to use because they are everywhere (and costco sells packs of 40 AA's for around $10). However, they are disposable causing hazardous waste, and they are not the best performers. When they are brand new, they work well. As the charge gets sucked out by the flash, the recycle times gradually get longer and longer, forcing you to wait between shooting exposures.
Ni-Cads have been around forever. They are relatively cheap, rechargeable, and produce faster recycle times. However, they don't hold as much of a charge, so you end up changing them more often and requiring you to bring a slew of batteries with you. They are also memory-type batteries. That means you have to fully discharge them before charging them again. You can buy the more expensive chargers that will discharge the batteries before charging, or just fire your flash until they are completely spent.
Nimh batteries are my choice. They are not too expensive ($20 for a set and a charger), hold a ton of energy (so you don't have to suddenly change batteries in the middle of the toast), and recycle at a quick, consistant rate until they are nearly completely spent. They are also memory-free so you can recharge them anytime without ruining the batteries.
External battery packs provide the most power and quickest recharge times. However, they also require extra cords and extra weight. For the right situation, and for some people this provides the best option. Personally, I hate cords on my cameras when I am shooting.
Wednesday, February 14, 2007
Happy Valentine's! And a b&w conversion for Photoshop
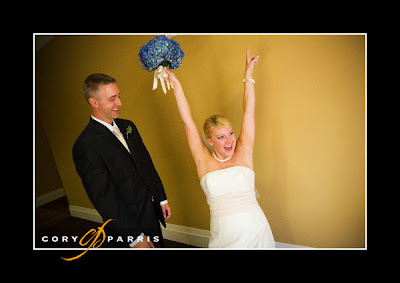
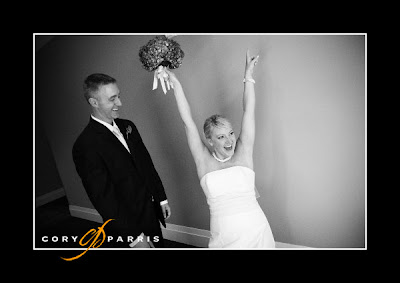
Today I'm going to show you how to make a really fast, simple, high-contrast black & white conversion.
The first step is to make sure that you have the default black on white color set.
 Then go the the layers palette and click on the adjustment layers symbol.
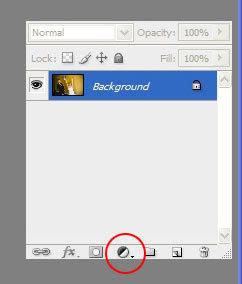
The third and final step is to choose the "Gradient Map" option.
All Done. Here is a before and after.
Tuesday, February 13, 2007
Seattle Photo Shoot on Sunday!
The photoshoot will be held on Sunday, February 18, 2007. Meet at the Pike Place Market Fish Throwers. Entry fee is $10 (there will be memberships to the Digital Wedding Forum given out for the top finishers for each 10 entries) at 1:30. Shooting will be from 1:45 to 3:15. Here are the rules: 1 camera, 1 lens with 85mm equivalent field of view (full framers use 85, crop camera users should be using a 50mm), no driving, and have fun. We will be meeting back at 3:15 to commence hanging out and enjoying adult beverages.
I hope to see lots of people there!
Monday, February 12, 2007
The Hows and Whys of Color Management!
Why would you want to be color managed? Well, if you haven't calibrated it already, your monitor sucks for looking at photographs! Out of the box, monitors are typically far too bright, have too much blue color, and make your photographs look horrible. The good news is that it is easy to fix!
The first step is to get some sort of monitor calibration device. You can find a whole lot of options at b&h, the world's largest photo store in New York. What you need really depends on how serious you are. Any of them are better than nothing and both Colorvision and Pantone have excellent solutions for around $200.
Then you follow the very easy steps that the software included in the bundle will walk you through. This takes about 15 minutes and should be done once every couple of months, unless you just bought a new monitor, in which case you should do it weekly until you see very little in the way of changes between adjustments.
Then you send in a file to your lab. Make sure to request no corrections. When you get the print back, compare it to your photograph on your monitor. You may need to make some minor corrections to your color profile.
Where should I get prints made?
Canon Lensmaking!
Okay, this is photogeek heaven! Check out how lenses are made at Canon!
Wedding Biz - Shooting!
My main goal when I photograph a wedding is to create what I think is the greatest wedding photographs I have ever created. I do this for me. It is my tastes that I am working with. My satisfaction and approval that I am looking for. My creative drive that I am trying to satisfy. My personal comfort zone that I am stretching, and leaving behind in my effort to create great images.
I am also shooting to create great images to put into my portfolio so I can sell my services to my next bride. I also shoot to add images to the portfolios of the florist, cake artist, venue, wedding coordinator, and band.
As a side benefit, trying to stretch creatively, create amazing work, and putting images into my future portfolio also ends up by delivering some great images for the client that I'm working for! As bizarre as it sounds, my business has increased exponentially by trying to satisfy myself rather than my clients!

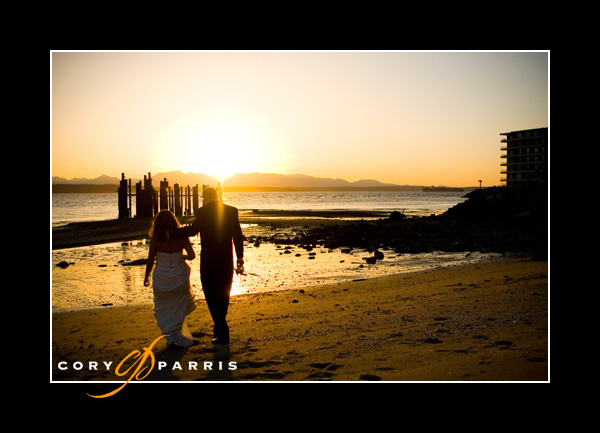
This image was taken during the daylight with flash as the main source of light on the couple. They were extremely backlit, so I set the exposure for the background slightly underexposed to give the darker blue sky and used the flash as the main light. This was something I had wanted to try, but hadn't much until this photograph earlier this year. Now I've done it several times. The couple loved the shot. Bonus!Go forth and produce the images you want. The clients that like those images will love you for it!
Setting Up Your Business for Success
Camera Gear - Lenses!
Here are some recent questions I've had about camera gear and my answers. I know what I'm trying to say, but if anything is unclear, please let me know so I can fix it!
I want a better lens, what should I buy?
There are so many different ways to answer this question. Most people start with a crop camera (something besides a Canon 5D or 1 series) with a kit lens. Pretty much any lens you buy will be an improvement over that!
50mm fixed focal length lens. Beginning photographers often overlook this lens. However, it is one of the sharpest lenses you can buy and it is a very good value. Both Canon and Nikon have an f1.8 version that is less than $100 (and really great versions at $300 for the f1.4). Whenever I suggest this lens, I get asked why anyone would want a lens that doesn't zoom. The simple answer is speed. A fast lens lets you take available light photographs in less light, or extends the reach and power of your flash.
The lens that comes with most kits is something like an 18-55 f3.5-5.6. What this means is that the f-stop (aperture) at 18mm is f3.5 and it slides to 5.6 at 55 mm. Lets compare that to the cream of the crop lenses that are available. The 17-55 2.8 IS lens that Canon makes is 2.8 the entire way. That means that at 17/18mm the 17-55 needs 67 percent of the amount of light to get the same shutter speed. At 55mm, the 17-55 needs only 25 percent of the amount of light. Now, let's compare even the amazing 17-55 2.8 IS to the $80 50 f1.8. The 50 f1.8 needs 33 percent of the light that the 17-55 2.8 needs to reach the same shutter speed. Compared to the kit lens at 50mm, it needs a mere 8 percent. You can get even more light if you go with the 50 1.4 which sits at 6 percent of the kit lens, which is a significant improvement over the 1.8.
However, having a fixed focal length lens does make it hard when you want to include more or less in the photograph (sometimes this is called the human zoom because the photographer has to move forward or back). Therefore, I also recommend the 17-55 2.8 IS lens for Canon users. Nikon also makes a version, but without the internal image stabilization. These are exceptionally high quality lenses that are capable of creating amazing images in the normal (for a crop camera) zoom range. If you can't afford the Canon/Nikon version or if this is just one of many hobbies, I have heard good things about the Tamron 17-50 2.8. When you switch from one the kit lenses to one of these, you will suddenly start seeing an increase in good photographs. Those using a full-frame sensor (5D & Canon 1 series), I suggest the 24-70L.
In addition to the light gathering advantages that these lenses offer, they also produce more "out-of-focus" areas. This is a huge advantage. Many photographers, like myself, love this. It enables the photographer to isolate the subject from their surroundings.
This photograph of my daughter's friend was taken with a wide aperture to make her stand out from the background
A lot of people also want to be able to take photographs of their kids sporting events. Depending upon the type of sport, you will need different equipment. For inside sports such as basketball and gymnastics, I would recommend the 50mm 1.8 (or 1.4 for a better built lens) or the 85 1.8 (or 1.2 if you have an extra $2000 to invest in your hobby). For outdoor sports, it's hard to beat the 70-200 zooms. The Canon 70-200 2.8 L IS (VR for Nikon) lens is fantastic. If you don't want to spend that much, I suggest the 70-200 4.0 L or the 70-200 2.8 HSM Sigma.
The last type of lens that someone would need would be a wide-angle. These are great for landscapes, architecture, group portraits, and for creating interesting images. I personally love wide angle lenses, but I didn't so much when I was first starting. The lenses I would suggest in this category would be the Canon 10-22, Nikon 12-24 and Tokina 12-24. For those that have a full-frame sensor, I suggest the 16-35L.
Are there situations where I wouldn't want the 2.8? I was taking pictures with it on auto and sometimes it would set to 4.0 - Should I set it to 2.8? What does 2.8 really mean?
Okay, there are several related questions here, so I will start with the most basic and work my way through them.
In the simplest terms, the aperture (f-stop) number represents the amount of light that the lens allows through to the camera. Each f-stop difference means the light allowed through is half of the f-stop before it. In the olden days when I started in photography, the numbers of the f-stop were engraved on the lens, so it was easy to remember them. The full f-stops are 1.0, 1.4, 2.0, 2.8, 4.0, 5.6, 8.0, 11, 16, 22, 32, 45, etc.
This image was taken with a smaller aperture to make everything from the wood post to the Herb Farm in the background in focus
The obvious question at this point would be, "So what does that do for me?" What it means is that the lower the aperture number, the more light a lens can gather, which allows for higher shutter speeds, less camera shake causing blurry images, less need for flash, and when you do use flash you have greater range and options with your flash
Something else that changes with the aperture is the Depth of Field, or how much of the frame is in focus. If you are taking an Ansel Adams type landscape, you will want to shoot at something like f22. If you want to isolate your subject from the background, you will want a very fast aperture (like 2.8 or faster) to throw everything else out of focus.
This is another example of a shallow depth of field. Her eyes and mouth are in focus, but the tip of her nose and her ears are out of focus, ensuring that when we look at the photograh, we look at her face and aren't distracted by the background.
Next time I'll tackle the question most often asked of me at weddings, "Why is your flash pointed sideways?"
Getting the Clients You Want
When you are shooting, whom are you shooting for? Are you creating images you think will sell, or are you shooting to get the clients you want?
About four years ago, I stopped trying to shoot what I thought my current the clients wanted to buy and started creating images that were more representative of what I wanted my portfolio to look like in the future. This is a very important difference in the way I was approaching wedding photography.
As a result of my new mindset, my work improved, my clients’ satisfaction levels went through the roof and most importantly, I was much happier.
The second part of this is only showing the things you want to sell. Don’t show what you think your clients want to see. Show what you love to do and what you excel at. I stopped showing any group portraits on my site or in my sample books.
Eventually, I started to find new, different clients from my old clientele. They wanted what I was showing, were eager to have me at their wedding, and were willing to pay more for it.
This goes for everything you show. Use the albums that you love. Show the wall samples like you want them to buy. Print up postcards that show your favorite image, not the one you think will be the best seller. Unlike with other businesses, if you captured one percent of the market, you would be overloaded, so what we, as photographers, are trying to do is find the RIGHT clients, rather than just any clients.
Cory Parris is wedding photographer in Seattle, Washington. He loves his wife, his kids, owning his own business, and photography. He is constantly mixing them together to see what he comes up with!
You can find Cory on the web at www.coryparris.com and here!
One Image from start to finish
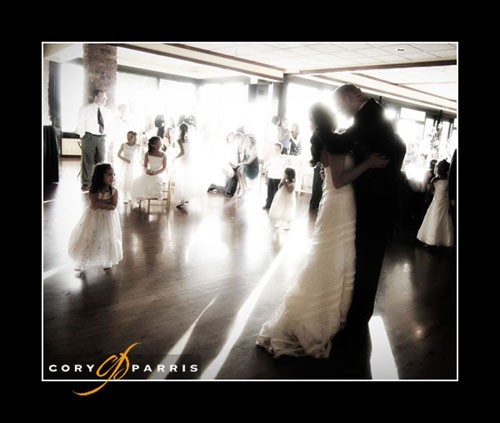
This is an explanation of how an image was created from start to finish.
This image was taken during the couples first dance. I saw the fantastic hard light coming from the far side of them and positioned myself to point the camera directly at the light so I could work with the flare. I find working with flare to be pretty unpredictable, so I was just playing, trying to get the look that I wanted. Then I saw the brides daughter watching them dance and thought it was perfect.
After I had the shot, I brought the image into Photoshop. First I cropped the image. Then I duplicated the background layer and changed the blending mode (found at the top of the layers palette) to Overlay. I adjusted the opacity to 70 per cent. Next I added a Guassian Blur to the Overlay layer to give it the glowing look.
My next step was I made a black and white conversion layer (my favorite method is via gradient map). I adjusted the layer opacity to about 60 per cent.
My final step was to add curves adjustment layer. I pulled up on the middle of the curve until the daughter was the tone that I wanted her. Then I inverted the layer and painted only the little girl back in using the attached layer mask to the adjustment layer.
Flatten, save and done!
Cory Parris is wedding photographer in Seattle, Washington. He loves his wife, his kids, owning his own business, and photography. He is constantly mixing them together to see what he comes up with!
You can find Cory on the web at www.coryparris.com and here!
Cory's Guide to Camera Gear - Version 1
I have to start by saying that I love photo gear. One of the best parts of owning my own business is having an excuse for buying the toys, errr…equipment. I’m also always happy to talk about photo gear, so give me a call or send me an email.
Before you start looking at gear, it might be helpful to know what kind of photographs you want to take. Sports photography requires different gear than still life photography. It will also have a big impact on the amount you need to budget for your new gear. I would also suggest that you try to assess how much you will actually use the equipment. No sense spending a large chunk of change on a paperweight!
Digital or Film
Film is a four-letter word and I don’t like talking about it. Unless you like the retro look or hate computers, buy digital.
SLR or PS
An SLR (Single Lens Reflex) is a camera with interchangeable lenses. It is the ultimate in photographic tool because of it’s flexibility with the ability to change lenses, add flash(es), filters, macro attachments, and a host of other goodies. In the right hands a digital SLR can perform magic! The downside to SLR’s is that they don’t produce better photographs than a PS (point and shoot) unless you know how to use it, and they are much larger and heavier.
The Point & Shoot is a great thing to have. Everyone should have one to just stick in their pocket so they can get a decent photograph wherever you go! Personally, I want to get one of the really small ones so I can have it with me everywhere. They are great for snapshots on the fly and outdoors when it is bright out. They are also much cheaper than SLR’s. Where they fall down is anytime the lighting is less than ideal. They have significantly more noise (digital grain) and horrible flash systems.
I am not an expert on PS cameras, so I will refer you on www.dpreview.com and www.stevesdigicams.com for more research.
I do, however, know something about SLR’s.
Brands and Systems
So many times when someone is choosing a camera, they forget to look at the rest of the system. When you buy a particular brand of camera, you are locked into their proprietary system of lenses and accessories. You can’t buy a Canon camera and Nikon lens or flash for it. “So?” You might ask. Well, you need to guess at your future needs as well as your current needs to see if the system works for you. Do they have the lens line-up that I am likely to need? Can I ever afford to buy a good lens? Why is Pentax cheaper than Canon? Could I rent a lens if I ever wanted to? Do they have an expedited professional service department? Okay, that last one may not apply.
Canon and Nikon have the most complete camera systems available with huge choices for lenses, flashes and are the two big dogs that everyone else is chasing. The advantage to the Big Dogs is choices, lots of choices! Camera models, lenses, multiple flashes to choose from, flash cords, battery packs and lots of other stuff. Some of the other competitors (Sony, Olympus and Pentax) are currently trying to woo consumers with some pretty cool features that the big boys aren’t offering.
A Little About Lenses
Why are lenses important? Lenses are what actually get the photograph from the real world to the camera sensor. So it makes sense that if you have a cheap, flawed lens, you will have poor, flawed images. I never buy the “kit” lens that comes almost free with the camera. For the most part, you get what you pay for. The exception is in the old classic 50mm lens. With most camera manufacturers, you can pick up a 50mm lens for under $100. This is not a sexy lens in that it doesn’t zoom, is small, and looks like a piece of plastic (because it is). What it does do is produce fantastic quality for the price. The 50mm lens is the easiest lens to produce.
The kit lens is usually something around an 18-55 with an aperture of 3.5-5.6. This means that the aperture (or f-stop) slides all the way to f5.6. Each full f-stop allows ½ the amount of light in. So an f2.8 constant would allow 4 times as much light in as an f5.6. All this mumbo jumbo that sounds like math (it is, but don’t let that stop you from enjoying photography), really means that lenses with larger apertures are better in low light. That is why professionals go the expense of buying the larger more expensive versions of the lenses. For example, I use a 17-55 2.8 IS lens. It covers the same range, but the quality of images it creates and the low light levels that it allows me to use make it worth the $1200 that I spent on it rather than the $80 that the kit lens costs.
You can also get very fast, higher quality, less expensive lenses if you want to use something without a zoom. Photographers always used to use prime (non-zoom) lenses because they had no choice. Now, it is mostly professionals that prize the speed, quality and uniquely beautiful out of focus areas (bokeh is the technical term for the shape and flavor of out of focus areas that is distinct to each lens) that prime lenses are capable of producing.
Wide-angle lenses can also add a lot of interest to architectural, portrait and landscape images, but are not commonly bought by most consumers. Go wide – it’s fun!
Megapixels and Cameras
Megapixels in digital SLR’s are over-rated. You can get a beautiful 20x30 print with any digital SLR currently in production, whether it is six or 16 megapixels. For photographs of people, six megapixels is more than enough to show wrinkles and pores. You may want more if you are doing a group of 50 that you want to blow up to 20x30 or if you are doing landscape photography for very large images.
Features you may want to look for…
Image stabilization. This allows you to use lower light levels without the shake and movement of your hands to make the image blurry. Canon and Nikon offer this in a select set of lenses, which is generally considered a slightly more effective system, but it more expensive. Sony and Pentax offer this as a feature in the body, which makes all the lenses you put on the body have this feature.
Frame rate. You will quite often see cameras advertising 2.5 frames per second, 3 fps, 4 fps, or even 8 fps. The higher frame rate is highly desirable for sports and action photography. However, just as important as frame rate is the buffer size and how quickly the buffer is cleared. The buffer data is usually something like 5 fps for 6 images in RAW or 5 fps for 12 images in JPEG. Then there is the speed that the camera writes to the card (which is partially dependent upon the card). The faster the frame rate, the better for sports, wildlife and other fast moving photography. Still life, landscape, and architectural would not require a quick frame rate.
Weather proofing. Normally available only on the professional series cameras and lenses, but it might be worth looking for if you plan to do photographs of mail carriers in the rain, snow, or sleet. For the dark of night you might want to think about a high-ISO and maybe some sort of flash!
Autofocus. All the cameras have it, but it does vary in accuracy, so check the online reviews and try them out for yourself.
Canon
Canon is the current leader in digital technology and has about a two to one lead in the professional market. They have a wide range of cameras, great lenses and a complete line of accessories. Their cameras feature the cleanest high-ISO files. This allows for better quality in dim to dark lighting as well as more ambient texture when using flash.
Nikon
Nikon make my favorite cameras to hold. They fit into the hand extremely well. Their sensors are second only to Canon in image quality.
Sony
Sony has just bought out the Konica and Minolta brands. Their first entry into the market is with the Alpha which features image stabilization in the camera, which allows lower shutter speeds without the need for a tripod.
Pentax
Pentax is trying to grow their SLR market share and their latest entry the K10D is perhaps the greatest combination of price and features in any digital SLR. Featuring things like in-camera image stabilization, water resistant seals, and a price around $900. They also have a very interesting lens line-up with some great prime (non-zoom) lenses.
Olympus
Olympus is putting their eggs in a new basket. Rather than modifying an existing camera and lens system, Olympus designed theirs from the ground up. It has some great features like the smaller size and weight of the camera and accessories, and some drawbacks like the smaller sensor that they use. Overall it is good systems at a good price if you don’t have any professional aspirations and maybe even if you do.
For more information you can check www.dpreview.com or send me an email!
Speeding Up the Workflow
Improving Your CS2 RAW Workflow With Pre-sets
How is it that some photographers claim that they get done with their post-processing so fast? How do I do all my post-processing for 600 photographs in three hours?
Hey, I thought you’d never ask. The answer really is quite simple. Pre-sets in Bridge. This is also the same concept Adobe is using with their new Lightroom project. By using pre-sets, you can bypass the slow and tiresome Adobe Camera Raw (ACR) window.
The first step to working with Bridge is to set up your processing defaults. You can see that I have mine set up to do a lot of the work for me. I find that it is faster to let Bridge adjust the Exposure, Shadows, and Brightness automatically. I have White Balance, Hue, Contrast, and Saturation set to a specific value.
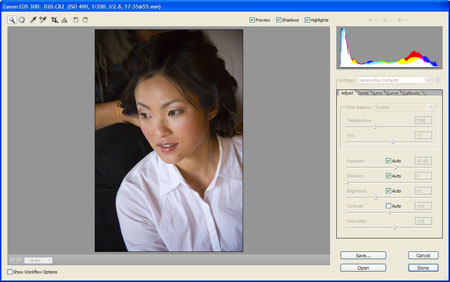
You will have to play with your setting until you get them perfected how you like them. A couple of tricks that I use is the lens correction tab to add a soft vignette to each images and I bump up the contrast and saturation to give it the pop that I love. Once you have it the way you like it, save the default setting by clicking the triangle just to the right of where it says Camera Raw Defaults and clicking "Save New Camera Raw Defaults". You will have to do this for each different camera model (5D, 30D, etc.) that you use.
Now, let's make sure the pre-sets we are about to use will show up when we want them to in Bridge. You will need to go to the Edit menu in Bridge and choose Preferences. Then click on the Advanced option in the list on the left. The screen below will show up (you may need to click on it to make it big enough to see). Make sure that you have the "Double click edits Camera Raw settings in Bridge" and "Use Distributed Cache When Possible" options are checked. This will make things work correctly.
Now that you have that done, you need to save some presets. Probably one of the first that you will want to set up is a b&w preset. It is possible to create some great b&w settings in bridge by desaturating and adjusting contrast. You can also use the calibrate tab to adjust the tones in the image in a way similar to using filters with black and white film. Once you have your recipe created, you need to save it by clicking the arrow just to the right of where it says Image Settings in the drop-down menu.
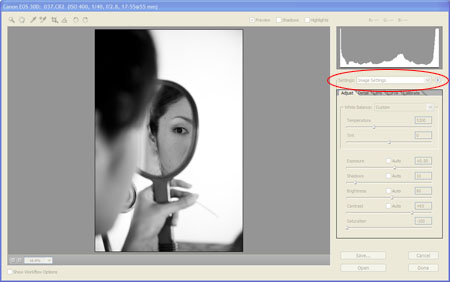
Choose the option Save Image Subset. When the next window pops up, choose only the check boxes that apply to the recipe that you want to save. In this case, it is saturation and contrast. 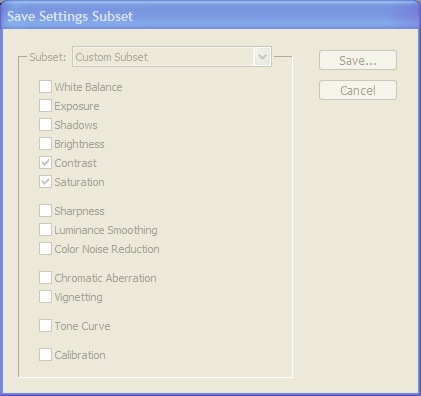
Click Save and give it a name that you will easily be able to recognize when you see it. For this one, you might try "B&W - Basic". That way you can keep all of your B&W actions together.
Now when you are in Bridge, you should be able to right click on any image thumbnail and see "B&W - Basic" as one of your options! Cool. Now repeat this process of saving presets for anything you normally do. I have them for exposure (-2.0, -1.5, -1.0, -0.5, -0.0, +0.5, etc.), brightness, contrast, curves, white balance, multiple b&w, a kind of cool sepia-ish muted color (true sepia is impossible to create in Bridge as far as I can tell), color pops, high contrast, and cross-process effects. And they are all point and click.
Another cool thing about this sort of processing is that the concepts and even some of the settings will be useable in Lightroom though you will have to go through the process of creating the presets again.
If you don't want to create your own presets, you can purchase them from Kevin Kubota and David Jay. Good luck and let me know how it goes!
Cory Parris is wedding photographer in Seattle, Washington. He loves his wife, his kids, owning his own business, and photography. He is constantly mixing them together to see what he comes up with!
You can find Cory on the web at www.coryparris.com and here!


