Showing posts with label photography. Show all posts

Wednesday, May 23, 2007

Gearbox!

I quite often get questions about what kind of gear I use. I'll happily tell you all, but first I have to get on my soapbox.


The most important piece of gear you will ever have in photography, is the gray thing sloshing around in your noggin! Gear is just a means to an end. Great photographers can create great images with cheap gear and horrible photographers can buy all the gear they want and it won't make any difference!


Here is the gear I use at almost every wedding:
-Canon 30D & 20D cameras
-Tokina 12-24 f4
-Canon 17-55 f2.8 IS
-Canon 50 f1.4
-Canon 85 f1.8
-Sigma 70-200 2.8 HSM
-Pocketwizards
-Canon 550EX x2
-Canon 580EX
-Lightstand

I have a whole bunch of other stuff that I sometimes use, but this makes my main kit.

Monday, April 30, 2007

"Hey, Cory! Why is your flash sideways?" AKA, The Bounce Flash Article!

I am finally getting started on my series of articles on flash. I am going to start with the type of flash I use most often - the on-camera bounce.

The reasons I use on-camera bounce:
  1. I move quickly and quite often have the two options of available light or on-camera flash. Sometimes the available light in a room is not flattering.
  2. I don't like direct on-camera flash in MOST situations as it produces very flat lighting with harsh shadows
  3. Soft, bounced lighting, when balanced with room lighting, looks natural and flattering.

The reasons NOT to use bounce flash
  1. Some rooms don't lend themselves well to bounce flash (ballrooms a mile wide with 40 foot ceilings, black paint on the walls, red paint on the walls if you are shootingJPG, etc.)
  2. It does not add any drama to the photographs (harsh lighting is dramatic and can add or detract from a photograph, soft lighting usually does neither).
  3. Beautiful natural lighting already exists in the environment you are in.

Equipment that you will need.
  1. A digital (or film, I suppose) SLR
  2. Flash capable of tilt and swivel.
  3. A piece of black plastic and some Velcro.
  4. Good batteries

Okay, here we go with the meat of the article.

Bounce flash is a quick and easy way to upgrade the lighting in a room. Whenever I am looking through my camera I am looking at the type and angle of light as well as content and composition. When I see that the lighting is mostly from overhead sources, I usually want to modify it somehow. Overhead lighting as the only source of light leaves dark shadows in the eyes and causes people to look tired. This is probably my least favorite type of lighting.

To use bounce flash, you don't have to do anything too difficult. You attach your flash to your camera (or to an off-camera shoe cord if you wanna get funky) and point the flash in the direction that you want the light to come from. Imagine that you have a big softbox on a set of wheels that you can position anywhere you want in the half-circle behind you. You can place directly to the left or right, directly overhead, directly behind you or the the left or right of directly behind. You obviously can't make it come from the far side of your subject because of the physics involved (think of shooting a cue ball in pool - you can't bounce the ball off the bumper directly on the far side of another ball without hitting the ball).


The softbox concept

A portrait on the fly using bounce flash

Now that you have your flash bouncing around the room, you need to control it a bit. The first thing to keep in mind is how you want the lighting to appear. Do you want to drown out the existing lighting, add to the existing lighting or somewhere in between? My favorite way to do it is to add to, but not completely overpower the existing lighting. I do this by manually setting the exposure to keep the room lighting the way I want it (to add to, but not completely overpower, I might set the exposure to underexpose the existing light by one to two stops). Also, the slower your shutter speed, the more you have to have the room lighting below the flash setting. To give you an example, if you are shooting at 1/20 of a second with only a one-stop difference between room light and flash, you will have blur from the movement of the people as recorded by the by room lighting after the flash has fired. In which case, you need to increase the difference to two stops to avoid the flash-blur look. Unless, of course, that is what you are going for!


Bounce from the right of the room balanced to the room light.

Something else that I wold recommend is controlling the light from falling directly into the frame (this is a more common problem when shooting wide). To do this, you either need to zoom your flash or create some sort of snoot-type device for your flash. You can see what I did here with a piece of black plastic (a file folder from Staples) and some Velcro. This prevents flash from hitting someone directly into the scene I am shooting. I've shown it to other people, but most don't share my enthusiasm for attaching ugly, home-made devices to their flashes, but willingly spend $40 on a piece of Tupperware to sit on top of it!


My setup with black plastic "bounce tunnel"!

I have four more hints with bounce flash. The first is to use a high ISO because this increases the sensitivity of the sensor, which in turn reduces how hard your flash has to work and reduces how badly you blind anyone that makes the mistake of standing next to you! Second, buy a good pair ofNiMH batteries. NiMH batteries keep a consistent recharge rate during the life of the batteries. With Alkaline batteries, the recycle times on your flash become longer and longer as the power is drained out of them. Third, be aware of your surroundings. It doesn't do any good to want the light to come from the left if the nearest wall is 120 feet away. It also doesn't do any good to point a flash directly at the mother of the bride's face! No matter how annoying you may find her, nothing good will come of blinding her! That last is just a joke; I haven't had an annoying MOB in years.


Another example of side bounce.


Finally, experimentation is good! In fact, it is the only way to get a good handle on using bounce flash. Go forth and bounce!

Wednesday, March 14, 2007

Direction and Quality of Light

I was going to start writing my articles on flash today, but I thought that as a prologue, I would first talk about the quality and direction of light.

Light, in my mind, has two characteristics. Direction and Quality. Light can surround you almost perfectly even from every direction, or it can stream harshly from one direction. It can be soft or it can be harsh. It can have these traits whether you are using natural light or creating the light with flash (this is why this article came first).

Light can be soft, harsh, directional or enveloping. I've grabbed some examples from my latest wedding to illustrate and show you how I use the different light qualities.


Natural, soft window light streaming in the door. I chose to backlight the dress so that the light would shine through it.


This was taken with available light in the room. This was less of a conscious choice and more of grabbing a moment with the current equipment.


I placed Kellie near the window to get the soft, very directional light on her face.


Available light in the chapel.


As the ring bearer and flower girl were walking down the aisle, I was luck enough to capture the harsh, directional light of Grandma's flash, which backlit them beautifully.


Again, using the available light (actually more available darkness). The alter was lit, but the rest of the room had only candles for illumination causing the couple to be severely backlit.


The soft, enveloping lighting of a bounced flash.


This image is the result of two flashes. One on a lightstand creating the main exposure and backlighting the couple, and one on camera at one stop below the exposure to illuminate the near side of the couple.


This image is during the college fight song, with the off-camera flash creating the main exposure (and harsh directional lighting) and the on-camera at one stop below filling in the shadows and making the effect less harsh.


The final image of David's fist-pump is again the soft, enveloping, directional (from the right and above) light of bounce flash.

Monday, March 12, 2007

The Wedding Photography Project!

Most of you probably already know that I run another website that features articles written by photographers other than myself at the Wedding Photography Project. There are two new articles there by Jeff Lazo of ProDPI lab talking about printing, and an excellent article by Neil van Niekerk about balancing flash with fireworks. Great stuff!

Friday, March 2, 2007

Back to Basics - 3 Camera Settings for Rockin' Exposures!

There are so many bells and wistles on cameras that people get lost. It is a great example of how adding capabilities makes things more obscure. I recently bought a camera that is around 50 years old. How few buttons and features there were on the camera really made me realize how complex a digital SLR really is.

On this camera, there are three settings - aperture, shutter speed and focus. Because it has no built-in meter, getting the correct exposure was a little bit of guesswork for most people. With film, though you could be pretty far off and still get a decent image.

When everything is stripped down like this, you can see that there is really only three setting that you need to get a proper exposure, plus you need to focus the camera. Everything else is extra or bonuses.

The three settings you need to take control of on your camera are the basics, that we talked about above, plus the ISO (it used to be called film speed, but, since film is optional these days, let's call it ISO). The ISO is what people forget they can change.

Shutter speed controls the amount of time the sensor/film is exposed to light. Aperture or f-stop controls the size of the hole at the back of the lens. ISO controls how sensitive the sensor/film is to light. With film, you are basically limited to what it says on the side of the film box (there are other options, but that is far more advanced than we are talking now). With digital, the ISO can be changed anytime!

The effect of changing shutter speeds
When your shutter speeds are slow, you will see blur in fast moving objects. A faster shutter speed freezes the action. Also, if your shutter speed gets too slow, the shaking of your hands will cause the entire photograph to become blurry. For a good rule of thumb, try to keep your shutter speed at 1/60 of a second or higher (1/125, 1/250, etc.) with a normal lens. With telephoto lenses you will need faster shutter speeds.

The effect of changing apertures
The aperture controls what is called "depth of field". Depth of field is how much of the photograph will be in focus. We are all familiar with depth of field, but we rarely think about it. Ansel Adams liked a lot of depth of field. He wanted everything in his images to be sharply in focus. Most fashion models and many portrait photographers like the opposite. They want their subject to be sharply in focus, with the background becoming extremely blurry. That way, when someone looks at the photograph, they notice the person rather than the background. A wider aperture makes for more background blur (1.4, 2.0, 2.8), which you can see with much of my work. A smaller aperture provides more of the image in focus (8, 11, 16, 22, etc.).

The effect of changing ISO
Changing your ISO also has a significant impact on your images. Lower ISO speeds provide finer detail, smoother gradations, more vibrant color, and greater exposure latitude (exposure latitude is a fancy way of saying that you can screw up more and come up with a good image). Higher ISO creates more noise or grain. So it seems obvious that the lower ISO's are better. Well, that is true for most cases, but, when you have very little light to work with, or you are trying to create a particular look, higher ISO is the way to go.

How they work together
Okay, so all of this is fine and dandy. It's pretty simple to understand. Now, how does it all work in the real world?

I'll start by explaining how I work. I love shallow depth of field, vibrant colors, sharp b&w's, and high ISO's. The shallow depth of field makes whoever I am photographing stand out from the background. Vibrant colors and contrasty b&w images are fairly self-explanatory. I prefer that images have impact rather than being subtle. I love high ISO's because they allow me to take photographs that I might not be able to get otherwise.

I keep my cameras at apertures around f2.8 or lower most of the time. The exceptions are when I am taking scenics and when I am photographing groups. At these times, you need more depth of field to make all the important stuff be in focus. That means the things that change more often are shutter speed and ISO. They change according to the light level that you are shooting in.

If shutter speeds get too high (above 1/1000 of a second unless I'm already at ISO 100), turn down the ISO. If they get too low (below around 1/60 of a second with a normal lens), turn up the ISO.

Of course, this a vast over-simplification (from my point of view), but it's how I work in many instances. As always, let me know if I'm speaking a foreign language (photogeek), and I'll try to say it again in English!

Tuesday, February 27, 2007

Flashin' for the fun of it!

On camera flash is at once over-rated and over-maligned. It is one of the most versatile and empowering tools in a photographer's bag. Over the next couple of weeks I'm going to write a series of articles about lovin the flash!

Here is a quick overview of what I will be discussing.

Hey, Cory! Why is your flash sideways?


Quick Group Portrait Lighting for the PJ Wedding Shooter

Dynamic Lighting Using Off-Camera Flash


Flashin' in the Sun

Tuesday, February 20, 2007

Interesting B&W Conversion


Sean Flanigan has a fun b&w technique to play with over on his blog. Below is the photograph I took of Leslie recently. I played with the technique Sean talks, modified it a bit and added a slight sepia tone to add to the vintage feel.

Friday, February 16, 2007

The steps to a photography business - the short version!

Start by taking stock of what you have and what your goals are. What are your assets? Money, time, etc. How are your images? Fantastic, needs work, true beginner. Where do you want to be in 1 year? 3 years? 5 years?

My answers would go in this order:

1) Get what you need in the way of equipment to produce good work. This does not need to be the flashiest of gear (a 50 1.8 or 35 f2 could be a big improvement in creating a "different" look on the cheap as would a 85 1.8). A vivitar flash and some pocket wizards (or generic alternative) can create dramatic results in the right hands as Zach Arias has often shown. Also get something wide (20mm on 5d or a 12-24 f4 tokina on a crop camera) to add drama and see things a different way. With a couple of these suggestions, you can be producing a wide variety of different looks and have spent less than $1000. It also works as a backup strategy if something breaks.

2) Educate yourself in creating amazing images. One Light is a good place to start. As is the usual $100 Denis Reggie tour, or if Huy is doing a short course in your area. There are also many online resources. Second shooting for great shooters would work very well.

3) Once you know how to take amazing images, are inspired, well-equipped to take advantage of the opportunities you have or will get, and have a website capable of showing off your work in a up-scale, stylish way, then you can pour some money into advertising.

It is hard to work up a buzz as an average photographer, so educate yourself, equip yourself, produce some excellent work, THEN attack the marketplace. Spending money on advertising before you are ready is just wasting money. Getting yourself in position to attack the marketplace makes more sense.

What you have in the way of assets (namely time and money) will determine your strategy for the attack and the timetable involved. If you have more money than time (full time well-paying job and a family for example), spend the money on the best possible samples and advertise in the biggest, splashiest places. If your assets are more on the time side (part time working bachelor), then you might get a couple nice samples and try to get your name out by meeting everyone that will meet with you (florists, planners, venue coordinators, other photographers, etc.).

Choosing the right flash batteries

Here's a little detail that people rarely think or talk about. What type of batteries should you be using in your flash?

There are basically four options: alkaline, nimh, ni-cad, and external packs.

Alkaline batteries are the easiest to use because they are everywhere (and costco sells packs of 40 AA's for around $10). However, they are disposable causing hazardous waste, and they are not the best performers. When they are brand new, they work well. As the charge gets sucked out by the flash, the recycle times gradually get longer and longer, forcing you to wait between shooting exposures.

Ni-Cads have been around forever. They are relatively cheap, rechargeable, and produce faster recycle times. However, they don't hold as much of a charge, so you end up changing them more often and requiring you to bring a slew of batteries with you. They are also memory-type batteries. That means you have to fully discharge them before charging them again. You can buy the more expensive chargers that will discharge the batteries before charging, or just fire your flash until they are completely spent.

Nimh batteries are my choice. They are not too expensive ($20 for a set and a charger), hold a ton of energy (so you don't have to suddenly change batteries in the middle of the toast), and recycle at a quick, consistant rate until they are nearly completely spent. They are also memory-free so you can recharge them anytime without ruining the batteries.

External battery packs provide the most power and quickest recharge times. However, they also require extra cords and extra weight. For the right situation, and for some people this provides the best option. Personally, I hate cords on my cameras when I am shooting.

Monday, February 12, 2007

Camera Gear - Lenses!

Here are some recent questions I've had about camera gear and my answers. I know what I'm trying to say, but if anything is unclear, please let me know so I can fix it!

I want a better lens, what should I buy?
There are so many different ways to answer this question. Most people start with a crop camera (something besides a Canon 5D or 1 series) with a kit lens. Pretty much any lens you buy will be an improvement over that!

50mm fixed focal length lens. Beginning photographers often overlook this lens. However, it is one of the sharpest lenses you can buy and it is a very good value. Both Canon and Nikon have an f1.8 version that is less than $100 (and really great versions at $300 for the f1.4). Whenever I suggest this lens, I get asked why anyone would want a lens that doesn't zoom. The simple answer is speed. A fast lens lets you take available light photographs in less light, or extends the reach and power of your flash.

The lens that comes with most kits is something like an 18-55 f3.5-5.6. What this means is that the f-stop (aperture) at 18mm is f3.5 and it slides to 5.6 at 55 mm. Lets compare that to the cream of the crop lenses that are available. The 17-55 2.8 IS lens that Canon makes is 2.8 the entire way. That means that at 17/18mm the 17-55 needs 67 percent of the amount of light to get the same shutter speed. At 55mm, the 17-55 needs only 25 percent of the amount of light. Now, let's compare even the amazing 17-55 2.8 IS to the $80 50 f1.8. The 50 f1.8 needs 33 percent of the light that the 17-55 2.8 needs to reach the same shutter speed. Compared to the kit lens at 50mm, it needs a mere 8 percent. You can get even more light if you go with the 50 1.4 which sits at 6 percent of the kit lens, which is a significant improvement over the 1.8.

However, having a fixed focal length lens does make it hard when you want to include more or less in the photograph (sometimes this is called the human zoom because the photographer has to move forward or back). Therefore, I also recommend the 17-55 2.8 IS lens for Canon users. Nikon also makes a version, but without the internal image stabilization. These are exceptionally high quality lenses that are capable of creating amazing images in the normal (for a crop camera) zoom range. If you can't afford the Canon/Nikon version or if this is just one of many hobbies, I have heard good things about the Tamron 17-50 2.8. When you switch from one the kit lenses to one of these, you will suddenly start seeing an increase in good photographs. Those using a full-frame sensor (5D & Canon 1 series), I suggest the 24-70L.

In addition to the light gathering advantages that these lenses offer, they also produce more "out-of-focus" areas. This is a huge advantage. Many photographers, like myself, love this. It enables the photographer to isolate the subject from their surroundings.

mckenna-out-of-focus-areas.jpg
This photograph of my daughter's friend was taken with a wide aperture to make her stand out from the background

A lot of people also want to be able to take photographs of their kids sporting events. Depending upon the type of sport, you will need different equipment. For inside sports such as basketball and gymnastics, I would recommend the 50mm 1.8 (or 1.4 for a better built lens) or the 85 1.8 (or 1.2 if you have an extra $2000 to invest in your hobby). For outdoor sports, it's hard to beat the 70-200 zooms. The Canon 70-200 2.8 L IS (VR for Nikon) lens is fantastic. If you don't want to spend that much, I suggest the 70-200 4.0 L or the 70-200 2.8 HSM Sigma.

The last type of lens that someone would need would be a wide-angle. These are great for landscapes, architecture, group portraits, and for creating interesting images. I personally love wide angle lenses, but I didn't so much when I was first starting. The lenses I would suggest in this category would be the Canon 10-22, Nikon 12-24 and Tokina 12-24. For those that have a full-frame sensor, I suggest the 16-35L.

Are there situations where I wouldn't want the 2.8? I was taking pictures with it on auto and sometimes it would set to 4.0 - Should I set it to 2.8? What does 2.8 really mean?

Okay, there are several related questions here, so I will start with the most basic and work my way through them.

In the simplest terms, the aperture (f-stop) number represents the amount of light that the lens allows through to the camera. Each f-stop difference means the light allowed through is half of the f-stop before it. In the olden days when I started in photography, the numbers of the f-stop were engraved on the lens, so it was easy to remember them. The full f-stops are 1.0, 1.4, 2.0, 2.8, 4.0, 5.6, 8.0, 11, 16, 22, 32, 45, etc.

willows-large-depth-of-field.jpg
This image was taken with a smaller aperture to make everything from the wood post to the Herb Farm in the background in focus

The obvious question at this point would be, "So what does that do for me?" What it means is that the lower the aperture number, the more light a lens can gather, which allows for higher shutter speeds, less camera shake causing blurry images, less need for flash, and when you do use flash you have greater range and options with your flash

Something else that changes with the aperture is the Depth of Field, or how much of the frame is in focus. If you are taking an Ansel Adams type landscape, you will want to shoot at something like f22. If you want to isolate your subject from the background, you will want a very fast aperture (like 2.8 or faster) to throw everything else out of focus.

stclair-out-of-focus-areas.jpg
This is another example of a shallow depth of field. Her eyes and mouth are in focus, but the tip of her nose and her ears are out of focus, ensuring that when we look at the photograh, we look at her face and aren't distracted by the background.

Next time I'll tackle the question most often asked of me at weddings, "Why is your flash pointed sideways?"

Getting the Clients You Want

When you are shooting, whom are you shooting for? Are you creating images you think will sell, or are you shooting to get the clients you want?

About four years ago, I stopped trying to shoot what I thought my current the clients wanted to buy and started creating images that were more representative of what I wanted my portfolio to look like in the future. This is a very important difference in the way I was approaching wedding photography.

As a result of my new mindset, my work improved, my clients’ satisfaction levels went through the roof and most importantly, I was much happier.

The second part of this is only showing the things you want to sell. Don’t show what you think your clients want to see. Show what you love to do and what you excel at. I stopped showing any group portraits on my site or in my sample books.

Eventually, I started to find new, different clients from my old clientele. They wanted what I was showing, were eager to have me at their wedding, and were willing to pay more for it.

This goes for everything you show. Use the albums that you love. Show the wall samples like you want them to buy. Print up postcards that show your favorite image, not the one you think will be the best seller. Unlike with other businesses, if you captured one percent of the market, you would be overloaded, so what we, as photographers, are trying to do is find the RIGHT clients, rather than just any clients.

cory-parris-portfolio-baker.jpg

Cory Parris is wedding photographer in Seattle, Washington. He loves his wife, his kids, owning his own business, and photography. He is constantly mixing them together to see what he comes up with!

You can find Cory on the web at www.coryparris.com and here!

One Image from start to finish

featuretteonline.jpg


This is an explanation of how an image was created from start to finish.

This image was taken during the couples first dance. I saw the fantastic hard light coming from the far side of them and positioned myself to point the camera directly at the light so I could work with the flare. I find working with flare to be pretty unpredictable, so I was just playing, trying to get the look that I wanted. Then I saw the brides daughter watching them dance and thought it was perfect.

After I had the shot, I brought the image into Photoshop. First I cropped the image. Then I duplicated the background layer and changed the blending mode (found at the top of the layers palette) to Overlay. I adjusted the opacity to 70 per cent. Next I added a Guassian Blur to the Overlay layer to give it the glowing look.

My next step was I made a black and white conversion layer (my favorite method is via gradient map). I adjusted the layer opacity to about 60 per cent.

My final step was to add curves adjustment layer. I pulled up on the middle of the curve until the daughter was the tone that I wanted her. Then I inverted the layer and painted only the little girl back in using the attached layer mask to the adjustment layer.

Flatten, save and done!

Cory Parris is wedding photographer in Seattle, Washington. He loves his wife, his kids, owning his own business, and photography. He is constantly mixing them together to see what he comes up with!

You can find Cory on the web at www.coryparris.com and here!

Speeding Up the Workflow

Improving Your CS2 RAW Workflow With Pre-sets

How is it that some photographers claim that they get done with their post-processing so fast? How do I do all my post-processing for 600 photographs in three hours?

Hey, I thought you’d never ask. The answer really is quite simple. Pre-sets in Bridge. This is also the same concept Adobe is using with their new Lightroom project. By using pre-sets, you can bypass the slow and tiresome Adobe Camera Raw (ACR) window.

The first step to working with Bridge is to set up your processing defaults. You can see that I have mine set up to do a lot of the work for me. I find that it is faster to let Bridge adjust the Exposure, Shadows, and Brightness automatically. I have White Balance, Hue, Contrast, and Saturation set to a specific value.

canon-eos-30d-020cr2-iso-400-1-200-f-28-17-5555-mm-11-30-2006-7-26-54-pm.jpg

You will have to play with your setting until you get them perfected how you like them. A couple of tricks that I use is the lens correction tab to add a soft vignette to each images and I bump up the contrast and saturation to give it the pop that I love. Once you have it the way you like it, save the default setting by clicking the triangle just to the right of where it says Camera Raw Defaults and clicking "Save New Camera Raw Defaults". You will have to do this for each different camera model (5D, 30D, etc.) that you use.

Now, let's make sure the pre-sets we are about to use will show up when we want them to in Bridge. You will need to go to the Edit menu in Bridge and choose Preferences. Then click on the Advanced option in the list on the left. The screen below will show up (you may need to click on it to make it big enough to see). Make sure that you have the "Double click edits Camera Raw settings in Bridge" and "Use Distributed Cache When Possible" options are checked. This will make things work correctly.

preferences-12-1-2006-8-42-16-am.jpg

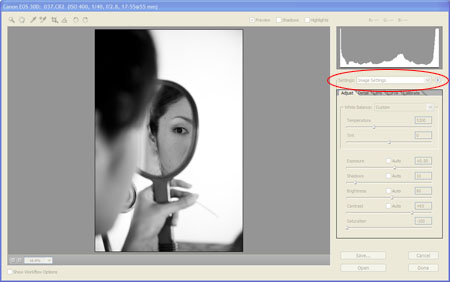
Now that you have that done, you need to save some presets. Probably one of the first that you will want to set up is a b&w preset. It is possible to create some great b&w settings in bridge by desaturating and adjusting contrast. You can also use the calibrate tab to adjust the tones in the image in a way similar to using filters with black and white film. Once you have your recipe created, you need to save it by clicking the arrow just to the right of where it says Image Settings in the drop-down menu.

canon-eos-30d-037cr2-iso-400-1-40-f-28-17-5555-mm-11-30-2006-8-01-40-pm.jpg

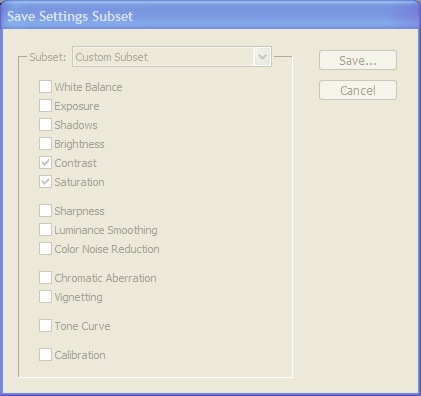
Choose the option Save Image Subset. When the next window pops up, choose only the check boxes that apply to the recipe that you want to save. In this case, it is saturation and contrast. save-settings-subset-12-1-2006-9-02-29-am.jpg

Click Save and give it a name that you will easily be able to recognize when you see it. For this one, you might try "B&W - Basic". That way you can keep all of your B&W actions together.

Now when you are in Bridge, you should be able to right click on any image thumbnail and see "B&W - Basic" as one of your options! Cool. Now repeat this process of saving presets for anything you normally do. I have them for exposure (-2.0, -1.5, -1.0, -0.5, -0.0, +0.5, etc.), brightness, contrast, curves, white balance, multiple b&w, a kind of cool sepia-ish muted color (true sepia is impossible to create in Bridge as far as I can tell), color pops, high contrast, and cross-process effects. And they are all point and click.

Another cool thing about this sort of processing is that the concepts and even some of the settings will be useable in Lightroom though you will have to go through the process of creating the presets again.

If you don't want to create your own presets, you can purchase them from Kevin Kubota and David Jay. Good luck and let me know how it goes!

Cory Parris is wedding photographer in Seattle, Washington. He loves his wife, his kids, owning his own business, and photography. He is constantly mixing them together to see what he comes up with!

You can find Cory on the web at www.coryparris.com and here!