There are so many bells and wistles on cameras that people get lost. It is a great example of how adding capabilities makes things more obscure. I recently bought a camera that is around 50 years old. How few buttons and features there were on the camera really made me realize how complex a digital SLR really is.
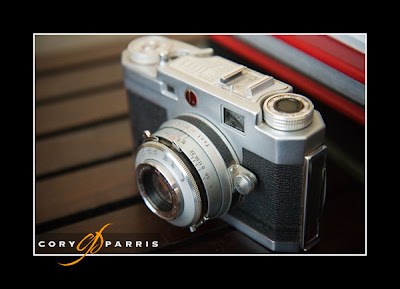
On this camera, there are three settings - aperture, shutter speed and focus. Because it has no built-in meter, getting the correct exposure was a little bit of guesswork for most people. With film, though you could be pretty far off and still get a decent image.
When everything is stripped down like this, you can see that there is really only three setting that you need to get a proper exposure, plus you need to focus the camera. Everything else is extra or bonuses.
The three settings you need to take control of on your camera are the basics, that we talked about above, plus the ISO (it used to be called film speed, but, since film is optional these days, let's call it ISO). The ISO is what people forget they can change.
Shutter speed controls the amount of time the sensor/film is exposed to light. Aperture or f-stop controls the size of the hole at the back of the lens. ISO controls how sensitive the sensor/film is to light. With film, you are basically limited to what it says on the side of the film box (there are other options, but that is far more advanced than we are talking now). With digital, the ISO can be changed anytime!
The effect of changing shutter speedsWhen your shutter speeds are slow, you will see blur in fast moving objects. A faster shutter speed freezes the action. Also, if your shutter speed gets too slow, the shaking of your hands will cause the entire photograph to become blurry. For a good rule of thumb, try to keep your shutter speed at 1/60 of a second or higher (1/125, 1/250, etc.) with a normal lens. With telephoto lenses you will need faster shutter speeds.
The effect of changing aperturesThe aperture controls what is called "depth of field". Depth of field is how much of the photograph will be in focus. We are all familiar with depth of field, but we rarely think about it. Ansel Adams liked a lot of depth of field. He wanted everything in his images to be sharply in focus. Most fashion models and many portrait photographers like the opposite. They want their subject to be sharply in focus, with the background becoming extremely blurry. That way, when someone looks at the photograph, they notice the person rather than the background. A wider aperture makes for more background blur (1.4, 2.0, 2.8), which you can see with much of my work. A smaller aperture provides more of the image in focus (8, 11, 16, 22, etc.).
The effect of changing ISOChanging your ISO also has a significant impact on your images. Lower ISO speeds provide finer detail, smoother gradations, more vibrant color, and greater exposure latitude (exposure latitude is a fancy way of saying that you can screw up more and come up with a good image). Higher ISO creates more noise or grain. So it seems obvious that the lower ISO's are better. Well, that is true for most cases, but, when you have very little light to work with, or you are trying to create a particular look, higher ISO is the way to go.
How they work together
Okay, so all of this is fine and dandy. It's pretty simple to understand. Now, how does it all work in the real world?
I'll start by explaining how I work. I love shallow depth of field, vibrant colors, sharp b&w's, and high ISO's. The shallow depth of field makes whoever I am photographing stand out from the background. Vibrant colors and contrasty b&w images are fairly self-explanatory. I prefer that images have impact rather than being subtle. I love high ISO's because they allow me to take photographs that I might not be able to get otherwise.
I keep my cameras at apertures around f2.8 or lower most of the time. The exceptions are when I am taking scenics and when I am photographing groups. At these times, you need more depth of field to make all the important stuff be in focus. That means the things that change more often are shutter speed and ISO. They change according to the light level that you are shooting in.
If shutter speeds get too high (above 1/1000 of a second unless I'm already at ISO 100), turn down the ISO. If they get too low (below around 1/60 of a second with a normal lens), turn up the ISO.
Of course, this a vast over-simplification (from my point of view), but it's how I work in many instances. As always, let me know if I'm speaking a foreign language (photogeek), and I'll try to say it again in English!


