Cameras and the Desire to Upgrade
Thursday, March 22, 2007
Tuesday, March 20, 2007
New variation on stroke and border!


I just finished the tutorial, when I decided to change it! Here's my new version. I played around with changing the canvas size in two steps rather than one, with the second step only streching the canvas from the top. Have fun!
Monday, March 19, 2007
Adding a stroke, border and logo!

I received an email the other day asking how I created my blog proof action that adds the border, keyline and logo to my images that I post on the blog. So here is a step by step tutorial on how I do it.
I want my blog proof to end up as 600 pixels on the long side. To do this, we will need to set up two actions, one for vertical and one for horizontal. Record this as you do it.
- Open a horizontal image
- Create a new Action called "Horizontal Blog Proof"
- Resize the image to 500 pixels wide
- Duplicate the layer - you can do this in the layers palette by dragging the layer called "background" to the new tab, which looks like a miniature blank piece of paper, at the bottom of the palette
- Resize the Canvas to 600 pixels and choose the appropriate color for your background (I chose black, of course). This will create a large, even black border all the way around your image.
- Select the top of your two layers and add a stroke of the color you like by clicking on the circled "f" at the bottom of the layers palette and choosing stroke. The image above is a one pixel, white, inner stroke.
- Now stop recording and create a snapshot of your file.
- It is time to set up your Logo file, so open your source logo.
- Resize your logo to slightly larger than you expect to use it on your image.
- Drag the logo to your image, this will create a new layer with just your logo on it. There should not be a background on your logo at this point. If there is, you may have to go to a different version of your logo that you received from your designer.
- Drag the logo to where you want it on your image.
- Resize the logo to the right size by using the Free Transform tool (Cntrl+T). Make sure to hold down the shift key as you drag the corner so the logo does not get warped.
- Delete the layers besides the logo (to delete the layer titled "background" you will have to rename it first)
- Create a blank layer and drag it to underneath the logo. You should now have two layers, one with your logo on it, and one blank below it.
- Save this in a location that you can find it again as a photoshop (.psd) file with the name something like "horizontal logo file for blog"
- Now look at your history palette and choose the snapshot of your file that you created before you started working on your logo.
- Go to your action and start recording again
- Choose the Place command (File-->Place) and choose the Horizontal logo file for blog.
- If it does not automatically put the logo in the right place, you may have to make sure all the corners line up.
- Flatten the image (Layer-->Flatten) and stop recording, you are done.
Wednesday, March 14, 2007
Direction and Quality of Light
I was going to start writing my articles on flash today, but I thought that as a prologue, I would first talk about the quality and direction of light.
Light, in my mind, has two characteristics. Direction and Quality. Light can surround you almost perfectly even from every direction, or it can stream harshly from one direction. It can be soft or it can be harsh. It can have these traits whether you are using natural light or creating the light with flash (this is why this article came first).
Light can be soft, harsh, directional or enveloping. I've grabbed some examples from my latest wedding to illustrate and show you how I use the different light qualities.
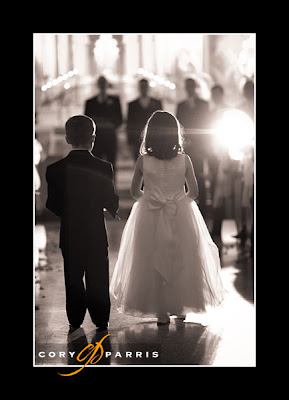
As the ring bearer and flower girl were walking down the aisle, I was luck enough to capture the harsh, directional light of Grandma's flash, which backlit them beautifully.
Light, in my mind, has two characteristics. Direction and Quality. Light can surround you almost perfectly even from every direction, or it can stream harshly from one direction. It can be soft or it can be harsh. It can have these traits whether you are using natural light or creating the light with flash (this is why this article came first).
Light can be soft, harsh, directional or enveloping. I've grabbed some examples from my latest wedding to illustrate and show you how I use the different light qualities.

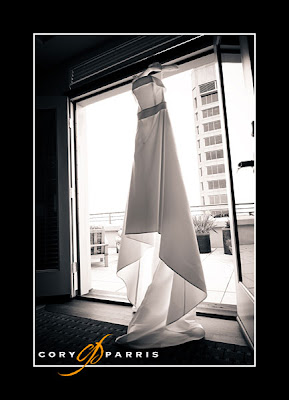
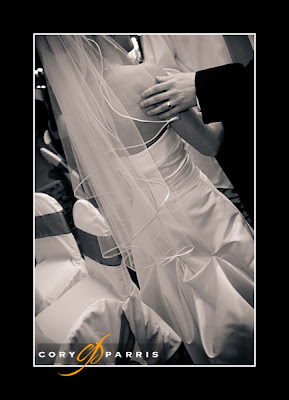
Natural, soft window light streaming in the door. I chose to backlight the dress so that the light would shine through it.

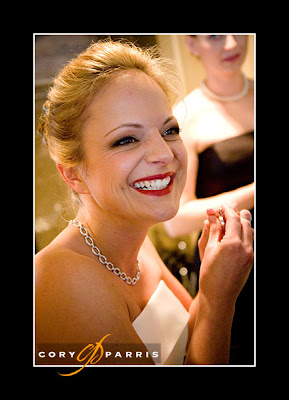
This was taken with available light in the room. This was less of a conscious choice and more of grabbing a moment with the current equipment.

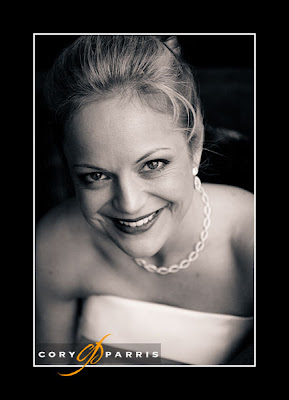
I placed Kellie near the window to get the soft, very directional light on her face.

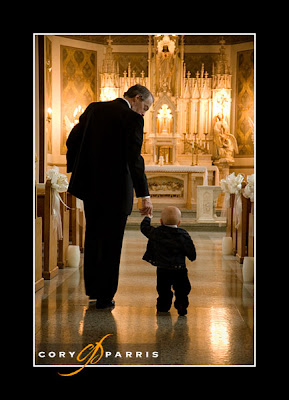
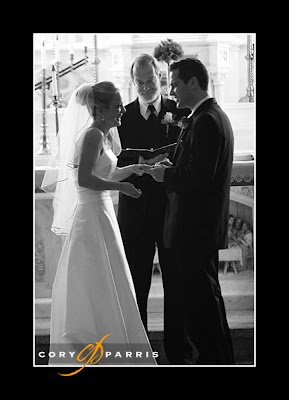
Available light in the chapel.

As the ring bearer and flower girl were walking down the aisle, I was luck enough to capture the harsh, directional light of Grandma's flash, which backlit them beautifully.

Again, using the available light (actually more available darkness). The alter was lit, but the rest of the room had only candles for illumination causing the couple to be severely backlit.

The soft, enveloping lighting of a bounced flash.

This image is the result of two flashes. One on a lightstand creating the main exposure and backlighting the couple, and one on camera at one stop below the exposure to illuminate the near side of the couple.

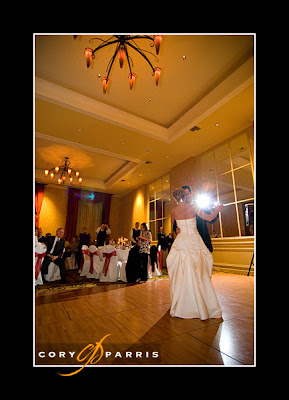
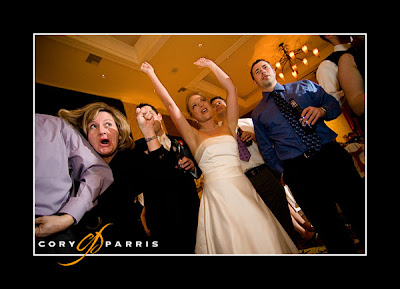
This image is during the college fight song, with the off-camera flash creating the main exposure (and harsh directional lighting) and the on-camera at one stop below filling in the shadows and making the effect less harsh.

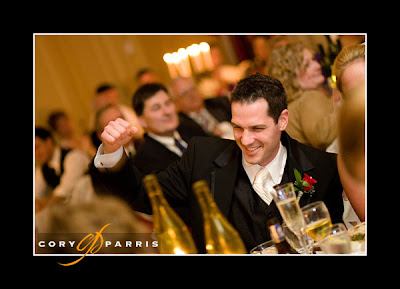
The final image of David's fist-pump is again the soft, enveloping, directional (from the right and above) light of bounce flash.
Monday, March 12, 2007
The Wedding Photography Project!
Most of you probably already know that I run another website that features articles written by photographers other than myself at the Wedding Photography Project. There are two new articles there by Jeff Lazo of ProDPI lab talking about printing, and an excellent article by Neil van Niekerk about balancing flash with fireworks. Great stuff!
Saturday, March 3, 2007
Good Article at PhotoEdu!
Jerry Frazier has a great article about the cost of doing business and how to do business with the opportunity to make a profit at his PhotoEdu blog. You don't have to constantly buy new gear to get great results!
Friday, March 2, 2007
PHOTO LOVECAT: ALBUM RESOURCES
For professional photographers and aspiring professionals, check out the album resource list over at Photo Lovecat: PHOTO LOVECAT: ALBUM RESOURCES
My favorite books are Graphistudio, Leather Craftsmen, Zookbinders, Queensberry, and (one that's not listed on her list) Photomounts Australia.
For designing the books, I prefer to do my own using Photojunction software.
My favorite books are Graphistudio, Leather Craftsmen, Zookbinders, Queensberry, and (one that's not listed on her list) Photomounts Australia.
For designing the books, I prefer to do my own using Photojunction software.
Back to Basics - 3 Camera Settings for Rockin' Exposures!
There are so many bells and wistles on cameras that people get lost. It is a great example of how adding capabilities makes things more obscure. I recently bought a camera that is around 50 years old. How few buttons and features there were on the camera really made me realize how complex a digital SLR really is.
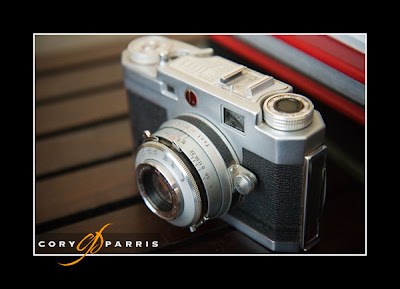 On this camera, there are three settings - aperture, shutter speed and focus. Because it has no built-in meter, getting the correct exposure was a little bit of guesswork for most people. With film, though you could be pretty far off and still get a decent image.
When everything is stripped down like this, you can see that there is really only three setting that you need to get a proper exposure, plus you need to focus the camera. Everything else is extra or bonuses.
The three settings you need to take control of on your camera are the basics, that we talked about above, plus the ISO (it used to be called film speed, but, since film is optional these days, let's call it ISO). The ISO is what people forget they can change.
Shutter speed controls the amount of time the sensor/film is exposed to light. Aperture or f-stop controls the size of the hole at the back of the lens. ISO controls how sensitive the sensor/film is to light. With film, you are basically limited to what it says on the side of the film box (there are other options, but that is far more advanced than we are talking now). With digital, the ISO can be changed anytime!
The effect of changing shutter speeds
When your shutter speeds are slow, you will see blur in fast moving objects. A faster shutter speed freezes the action. Also, if your shutter speed gets too slow, the shaking of your hands will cause the entire photograph to become blurry. For a good rule of thumb, try to keep your shutter speed at 1/60 of a second or higher (1/125, 1/250, etc.) with a normal lens. With telephoto lenses you will need faster shutter speeds.
The effect of changing apertures
The aperture controls what is called "depth of field". Depth of field is how much of the photograph will be in focus. We are all familiar with depth of field, but we rarely think about it. Ansel Adams liked a lot of depth of field. He wanted everything in his images to be sharply in focus. Most fashion models and many portrait photographers like the opposite. They want their subject to be sharply in focus, with the background becoming extremely blurry. That way, when someone looks at the photograph, they notice the person rather than the background. A wider aperture makes for more background blur (1.4, 2.0, 2.8), which you can see with much of my work. A smaller aperture provides more of the image in focus (8, 11, 16, 22, etc.).
The effect of changing ISO
Changing your ISO also has a significant impact on your images. Lower ISO speeds provide finer detail, smoother gradations, more vibrant color, and greater exposure latitude (exposure latitude is a fancy way of saying that you can screw up more and come up with a good image). Higher ISO creates more noise or grain. So it seems obvious that the lower ISO's are better. Well, that is true for most cases, but, when you have very little light to work with, or you are trying to create a particular look, higher ISO is the way to go.
How they work together
Okay, so all of this is fine and dandy. It's pretty simple to understand. Now, how does it all work in the real world?
I'll start by explaining how I work. I love shallow depth of field, vibrant colors, sharp b&w's, and high ISO's. The shallow depth of field makes whoever I am photographing stand out from the background. Vibrant colors and contrasty b&w images are fairly self-explanatory. I prefer that images have impact rather than being subtle. I love high ISO's because they allow me to take photographs that I might not be able to get otherwise.
I keep my cameras at apertures around f2.8 or lower most of the time. The exceptions are when I am taking scenics and when I am photographing groups. At these times, you need more depth of field to make all the important stuff be in focus. That means the things that change more often are shutter speed and ISO. They change according to the light level that you are shooting in.
If shutter speeds get too high (above 1/1000 of a second unless I'm already at ISO 100), turn down the ISO. If they get too low (below around 1/60 of a second with a normal lens), turn up the ISO.
Of course, this a vast over-simplification (from my point of view), but it's how I work in many instances. As always, let me know if I'm speaking a foreign language (photogeek), and I'll try to say it again in English!
Subscribe to:
Posts (Atom)