Improving Your CS2 RAW Workflow With Pre-sets
How is it that some photographers claim that they get done with their post-processing so fast? How do I do all my post-processing for 600 photographs in three hours?
Hey, I thought you’d never ask. The answer really is quite simple. Pre-sets in Bridge. This is also the same concept Adobe is using with their new Lightroom project. By using pre-sets, you can bypass the slow and tiresome Adobe Camera Raw (ACR) window.
The first step to working with Bridge is to set up your processing defaults. You can see that I have mine set up to do a lot of the work for me. I find that it is faster to let Bridge adjust the Exposure, Shadows, and Brightness automatically. I have White Balance, Hue, Contrast, and Saturation set to a specific value.

You will have to play with your setting until you get them perfected how you like them. A couple of tricks that I use is the lens correction tab to add a soft vignette to each images and I bump up the contrast and saturation to give it the pop that I love. Once you have it the way you like it, save the default setting by clicking the triangle just to the right of where it says Camera Raw Defaults and clicking "Save New Camera Raw Defaults". You will have to do this for each different camera model (5D, 30D, etc.) that you use.
Now, let's make sure the pre-sets we are about to use will show up when we want them to in Bridge. You will need to go to the Edit menu in Bridge and choose Preferences. Then click on the Advanced option in the list on the left. The screen below will show up (you may need to click on it to make it big enough to see). Make sure that you have the "Double click edits Camera Raw settings in Bridge" and "Use Distributed Cache When Possible" options are checked. This will make things work correctly.

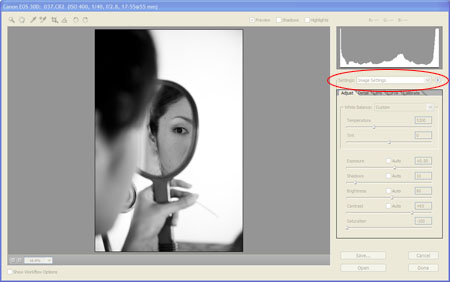
Now that you have that done, you need to save some presets. Probably one of the first that you will want to set up is a b&w preset. It is possible to create some great b&w settings in bridge by desaturating and adjusting contrast. You can also use the calibrate tab to adjust the tones in the image in a way similar to using filters with black and white film. Once you have your recipe created, you need to save it by clicking the arrow just to the right of where it says Image Settings in the drop-down menu.
Choose the option Save Image Subset. When the next window pops up, choose only the check boxes that apply to the recipe that you want to save. In this case, it is saturation and contrast. 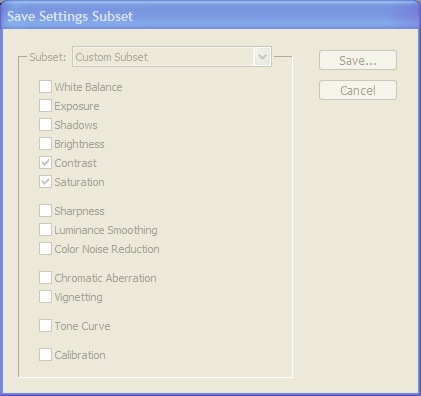
Click Save and give it a name that you will easily be able to recognize when you see it. For this one, you might try "B&W - Basic". That way you can keep all of your B&W actions together.
Now when you are in Bridge, you should be able to right click on any image thumbnail and see "B&W - Basic" as one of your options! Cool. Now repeat this process of saving presets for anything you normally do. I have them for exposure (-2.0, -1.5, -1.0, -0.5, -0.0, +0.5, etc.), brightness, contrast, curves, white balance, multiple b&w, a kind of cool sepia-ish muted color (true sepia is impossible to create in Bridge as far as I can tell), color pops, high contrast, and cross-process effects. And they are all point and click.
Another cool thing about this sort of processing is that the concepts and even some of the settings will be useable in Lightroom though you will have to go through the process of creating the presets again.
If you don't want to create your own presets, you can purchase them from Kevin Kubota and David Jay. Good luck and let me know how it goes!
Cory Parris is wedding photographer in Seattle, Washington. He loves his wife, his kids, owning his own business, and photography. He is constantly mixing them together to see what he comes up with!
You can find Cory on the web at www.coryparris.com and here!
No comments:
Post a Comment